Home / Handy Tips /
 Have you got a solid data backup system in place that protects the files, photos, and important documents saved on your Mac from hard drive failures?
If not, we suggest getting started with Time Machine. Time Machine is Mac’s in-built backup software.
In this article, we’ll walk you through the backup process step by step. If you run into any issues, don’t hesitate to get in contact with the team at Computer Cures. We are Mac experts, and can help you with all of your mac repair needs.
What is Time Machine?
Since about 2007, all Mac operating systems come with software called Time Machine. Time Machine is used to back up files, photos, and documents, as well as to transfer the contents of one Mac onto another Mac.
Time Machine is a free and flexible backup solution. You can use it to recover just one file, or to restore an entire hard drive.
What Does Time Machine Do?
Once you’ve setup Time Machine, the software will take ‘snapshots’ of your computer’s hard drive at regular intervals – once a day and once a week. This data is catalogued on an external storage device (such as an external hard drive) connected to your Mac computer via a USB or Thunderbolt port. Time Machine also works wirelessly with Apple’s Time Capsule.
This ‘snapshot’ captures everything on your hard drive, from photos and Word docs to movies and music. When the drive is full, Time Machine automatically deletes old backups and replaces them with new ones.
If you Mac runs on OS X Yosemite or a newer OS, you can also enable a Time Machine feature called ‘Local Snapshots’. This allows you to continue backing up your hard drive even when you’re away from your external Time Machine drive.
Why Use Time Machine?
There are two answers to this question.
First, because everyone should back up their hard drives on a regular basis. If you can implement an automated backup system, that’s even better.
As computer repair professionals, we’ve seen too many people lose important files and family photos because of a broken hard drive. Don’t let this happen to you.
Second, because Time Machine creates an intelligent, multi-layered backup of your hard drive. Unlike mass backups using just an external hard drive or cloud storage service, Time Machine allows you to retrieve specific files without completely restoring your hard drive.
How to Use Time Machine
Now that you know a little bit more about Time Machine, let’s get into how to use it.
Here, we’ll talk you through the setup process, how to retrieve a single file, and how to restore an entire hard drive.
How to Enable Time Machine on Your Mac Computer
1. Plug in your external hard drive.
2. Open System Preferences. Find this in your Dock, in your Applications folder, or in the Apple menu.

3. Click the Time Machine icon located in the bottom row.
4. Click “Select Backup Disk”.
5. Select the disk you’d like to use as your Time Machine backup drive – this will be the external hard drive you connected step 1.
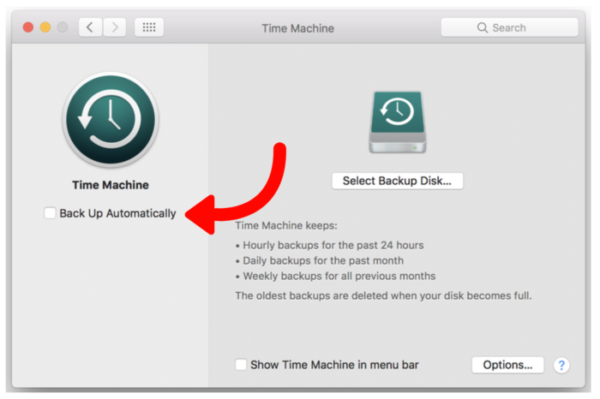
6. Tick the “Back Up Automatically” box.
How to Retrieve Files from a Time Machine Backup
1. Open System Preferences. Find this in your Dock, in your Applications folder, or in the Apple menu.
2. Click the Time Machine icon located in the bottom row.

3. Tick the “Show Time Machine in menu bar” box.
4. Click the Time Machine icon in your menu bar.
5. Click “Enter Time Machine”
6. Locate the file you’d like to retrieve. Then, click “Restore”.
7. Time Machine will save the restored file to its original location on your hard drive.
How to Restore a Hard Drive with Time Machine
1. Turn on your computer while holding the “Command” and “R” keys. This will take you to the macOS Recovery Partition. You should see a screen that reads “macOS Utilities”.
2. Click “Restore from Time Machine Backup” and then “Continue”.
3. Read through the information, before hitting “Contine”.
4. Chose the Time Machine backup you’d like to use then click “Continue”.
5. Select the most recent backup of your hard drive and click “Continue”.
Time Machine will then work its magic, your Mac will restart, and then you’ll be back in business.
Need Help with Time Machine?
Don’t put your precious photos or important files at risk. Use Time Machine, or a similar backup method, to safeguard your data against a failed hard drive. If you’d like help setting up Time Machine or another backup strategy, get in contact. . Phone us on 1300 553 166 or fill out the form on this page. Read more about our Macbook repair and upgrade services.


Leave A Comment