Home / Handy Tips /

Checklists are a handy tool for anyone at home or in the office, and surprisingly simple to create in Excel for your own use or to share with others. Checklists are great for:
- Making To-Do lists
- Tracking project and task progress
- Making and using forms
- Stocktaking products
- Budgeting and keeping track of spending
- Creating gift lists and registries, and much more
Excel is available as part of an Office 365 package subscription, or to purchase standalone, and is one of the best tools for productivity as well as recording and sharing information. Here’s how to easily create an Excel checklist that’s completely interactive and easily updatable.
1. Turn on the Developer tab
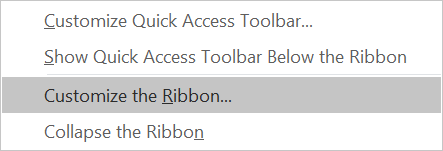
To create an Excel checklist, you need to turn on the Developer tab on the ribbon, if its not already showing. To do this, right-click any part of the Excel ribbon, and choose Customise the Ribbon from the dropdown menu that is shown.
Under Customise the Ribbon on the right-hand side of the screen, tick the Developer tab, and then click OK. The Developer tab will now be accessible from the Ribbon.
2. Create your list
The next step to creating your Excel checklist, is to make your list of items or tasks and then choose where you want to put your checkboxes. Click in the first cell you want to create a checkbox in and, from the Developer tab, click Insert and then select checkbox under Form Controls.
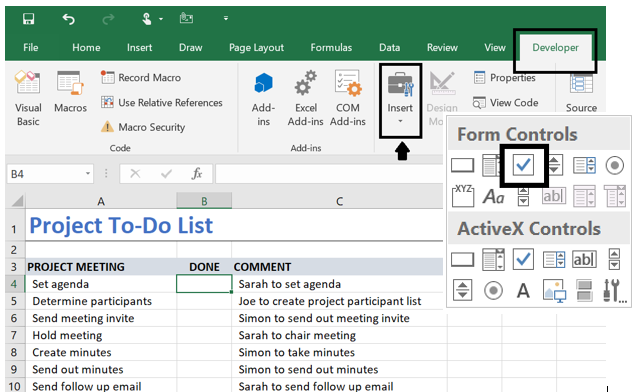
Your mouse cursor will then become a + which will allow you to draw the checkbox where you want it. You can click and drag the checkbox into position, and remove the text Check Box 1 by right-clicking on the checkbox and selecting Edit Text. The cursor will then appear at the start of the text inside the checkbox, and you can delete the text, resize the checkbox, and reposition it.
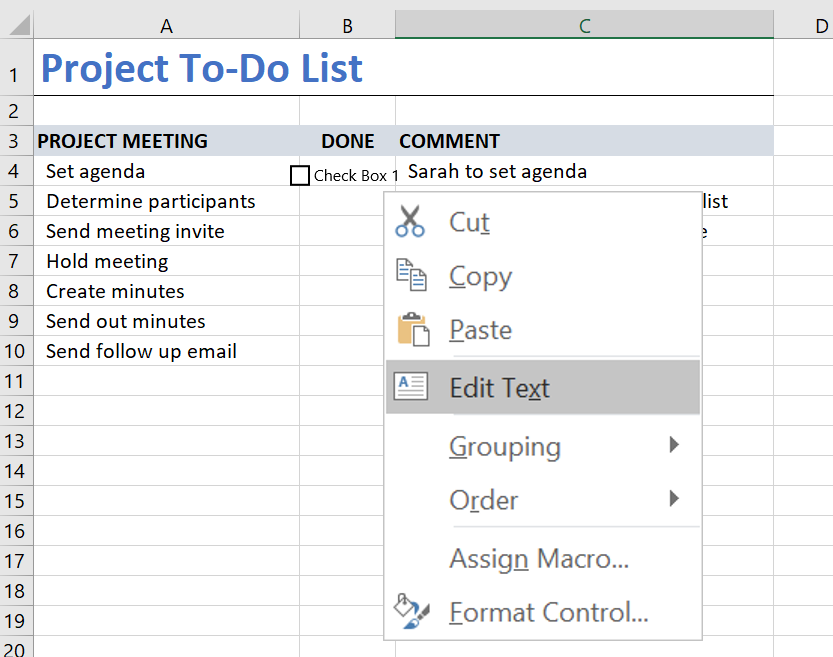
The easiest way to create checkboxes for the remainder of your list items is to highlight the cell the checkbox is in, and drag from the handle in the bottom right of the cell (the cursor will become a + when it is draggable) which will Autofill the checkboxes down.
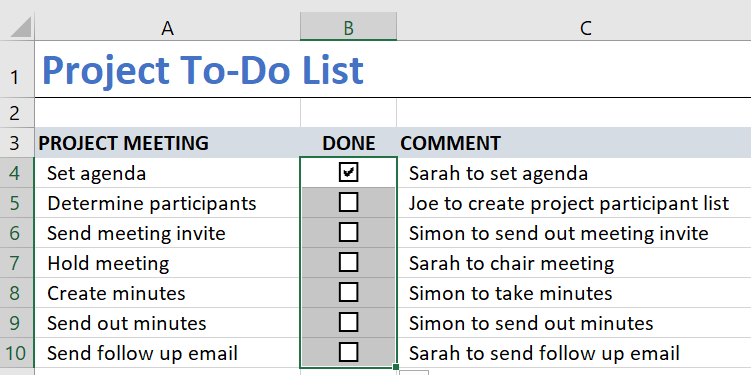
To check and uncheck items, simply left click the checkbox.
3. Use and modify your checkboxes
There are additional formatting options you can apply to your checkbox to change its appearance. Right-click the first checkbox, and choose Format Control from the menu. This will allow you to change the colour, size and other attributes of your checkbox, including whether your checkbox is checked or unchecked by default. Once you’ve formatted as required, click OK.
4. Link a checkbox to a cell for using in formulas
If you want to use formulas like IF, SUM, SUMIF or COUNTIF to capture how many checkboxes are checked or unchecked, you can link your checkbox to a cell that will display TRUE or FALSE, depending on its checked value.
Simply right-click on the checkbox, choose Format Control from the menu, and then click the Control tab. Click in Cell link, and then select the cell you wish the TRUE/FALSE value to be entered in (i.e. D2 – note, you don’t want this to be the same cell that you have the checkbox or other text in).
You will need to repeat this manually for each checkbox, so that each one has its own linked cell – Autofill will copy the value and link from the first cell only. Once these are all done, you can create a simple COUNTIF formula to total the number of cells that are FALSE, which will tell you how many action items are outstanding. And if you don’t want to see the TRUE/FALSE results, simply hide the column displaying them – this won’t affect any formulas that are using these values.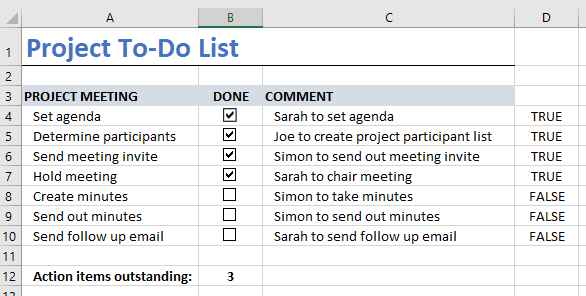
Want to know more about what you can do with Excel?
Now that you know how to create an Excel checklist, why not discover even more about your computer and Excel with our technical training service. We can take you through how to use your PC or laptop, and the other handy features that software like Excel has to increase your productivity.
Book a technical training session
Contact our friendly team to book in a technical training session to get more from your computer and its software. Give us a call on 1300 553 166.


Leave A Comment